


Drywall focused
Sized for the 1/2-inch drywall repair use. Keep the clips close to the damaged area.
ORDER PROCESSING: 1–2 BUSINESS DAYS
ESTIMATED DELIVERY: 10–12 BUSINESS DAYS AFTER PROCESSING
CLEAR PRODUCT DETAILS · SUPPORT FROM AMPLE
ORDER PROCESSING: 1–2 BUSINESS DAYS
ESTIMATED DELIVERY: 10–12 BUSINESS DAYS AFTER PROCESSING
CLEAR PRODUCT DETAILS · SUPPORT FROM AMPLE
ORDER PROCESSING: 1–2 BUSINESS DAYS
ESTIMATED DELIVERY: 10–12 BUSINESS DAYS AFTER PROCESSING
CLEAR PRODUCT DETAILS · SUPPORT FROM AMPLE
ORDER PROCESSING: 1–2 BUSINESS DAYS
ESTIMATED DELIVERY: 10–12 BUSINESS DAYS AFTER PROCESSING
CLEAR PRODUCT DETAILS · SUPPORT FROM AMPLE
ORDER PROCESSING: 1–2 BUSINESS DAYS
ESTIMATED DELIVERY: 10–12 BUSINESS DAYS AFTER PROCESSING
CLEAR PRODUCT DETAILS · SUPPORT FROM AMPLE
ORDER PROCESSING: 1–2 BUSINESS DAYS
ESTIMATED DELIVERY: 10–12 BUSINESS DAYS AFTER PROCESSING
CLEAR PRODUCT DETAILS · SUPPORT FROM AMPLE
ORDER PROCESSING: 1–2 BUSINESS DAYS
ESTIMATED DELIVERY: 10–12 BUSINESS DAYS AFTER PROCESSING
CLEAR PRODUCT DETAILS · SUPPORT FROM AMPLE
ORDER PROCESSING: 1–2 BUSINESS DAYS
ESTIMATED DELIVERY: 10–12 BUSINESS DAYS AFTER PROCESSING
CLEAR PRODUCT DETAILS · SUPPORT FROM AMPLE
ORDER PROCESSING: 1–2 BUSINESS DAYS
ESTIMATED DELIVERY: 10–12 BUSINESS DAYS AFTER PROCESSING
CLEAR PRODUCT DETAILS · SUPPORT FROM AMPLE
ORDER PROCESSING: 1–2 BUSINESS DAYS
ESTIMATED DELIVERY: 10–12 BUSINESS DAYS AFTER PROCESSING
CLEAR PRODUCT DETAILS · SUPPORT FROM AMPLE
ORDER PROCESSING: 1–2 BUSINESS DAYS
ESTIMATED DELIVERY: 10–12 BUSINESS DAYS AFTER PROCESSING
CLEAR PRODUCT DETAILS · SUPPORT FROM AMPLE
ORDER PROCESSING: 1–2 BUSINESS DAYS
ESTIMATED DELIVERY: 10–12 BUSINESS DAYS AFTER PROCESSING
CLEAR PRODUCT DETAILS · SUPPORT FROM AMPLE
Just $60 left away from FREE shipping!


LIMITED SUPPLY | HIGH DEMAND
🧱 Drywall focused: Sized for the 1/2-inch drywall repair use. Keep the clips close to the damaged area.
🔩 Clips and screws: A matching hardware set keeps the visible repair pieces together.
📏 Check the panel: Confirm panel thickness and damage location before fastening.
🧰 Easy to stage: Keep the clips and screws together beside the repair area.
Couldn't load pickup availability
Note: Only 5 units left in stock
I would check the drywall panel and clip position before fastening. Keeping the screws beside the repair would make the setup easier to follow.
Estimated delivery: 10–12 business days after processing.


Metal-Backed Repair Clips
For 1/2-Inch Drywall
Clips And Screws Together
Check Before Fastening
Metal-Backed Repair Clips
For 1/2-Inch Drywall
Clips And Screws Together
Check Before Fastening
Metal-Backed Repair Clips
For 1/2-Inch Drywall
Clips And Screws Together
Check Before Fastening
Metal-Backed Repair Clips
For 1/2-Inch Drywall
Clips And Screws Together
Check Before Fastening
Metal-Backed Repair Clips
For 1/2-Inch Drywall
Clips And Screws Together
Check Before Fastening
Metal-Backed Repair Clips
For 1/2-Inch Drywall
Clips And Screws Together
Check Before Fastening
Metal-Backed Repair Clips
For 1/2-Inch Drywall
Clips And Screws Together
Check Before Fastening
Metal-Backed Repair Clips
For 1/2-Inch Drywall
Clips And Screws Together
Check Before Fastening
Metal-Backed Repair Clips
For 1/2-Inch Drywall
Clips And Screws Together
Check Before Fastening
Metal-Backed Repair Clips
For 1/2-Inch Drywall
Clips And Screws Together
Check Before Fastening
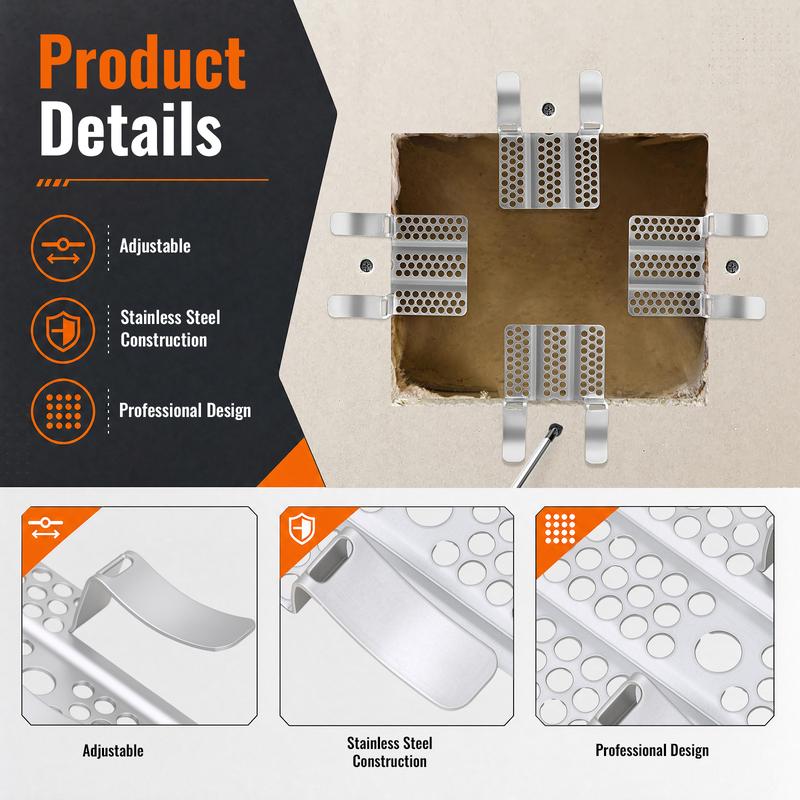
Make the repair easier to organize
Keep the repair hardware together while you prepare the damaged area. Metal-backed clips and screws give you a compact set for a 1/2-inch drywall repair.
The clip design provides a visible backing point for the repair. Confirm the clip position against the damaged drywall before fastening.
The set pairs screws with the clips for one repair setup. Keep both pieces together while you prepare the wall.
The set is made for 1/2-inch drywall repair. Match the hardware to the panel before you fasten anything.
Repair hardware details
Sized for the 1/2-inch drywall repair use. Keep the clips close to the damaged area.
A matching hardware set keeps the visible repair pieces together.
Confirm panel thickness and damage location before fastening.
Keep the clips and screws together beside the repair area.
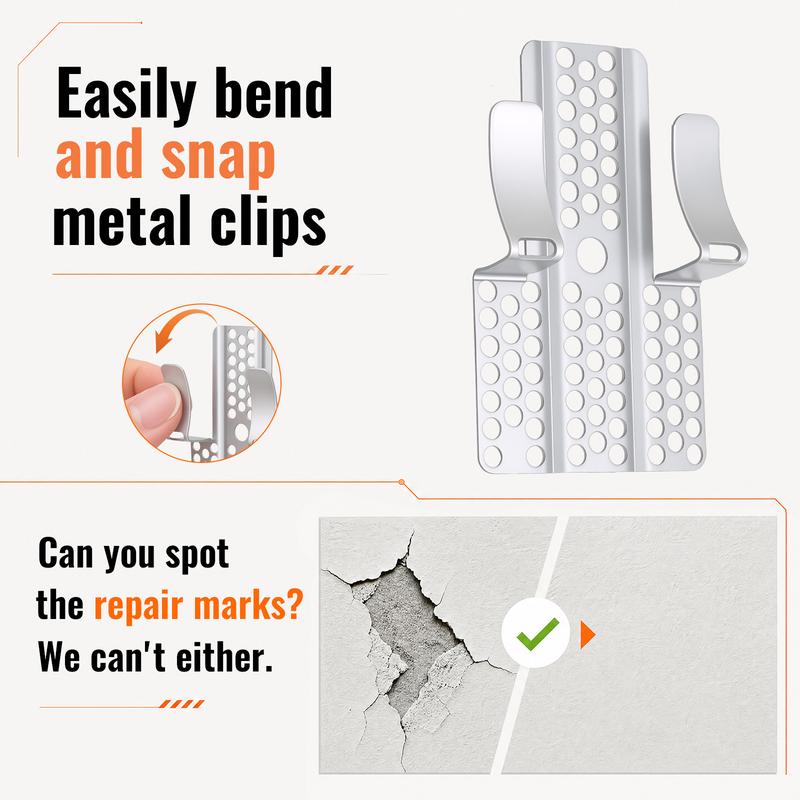
Prepare before fastening
Confirm that the panel is 1/2-inch drywall. Then mark the repair area you want to support.
Place the metal-backed clip at the repair point. Check its alignment before fastening.
Use the screws with the clip at the repair point. Inspect the finished area once the hardware is in place.
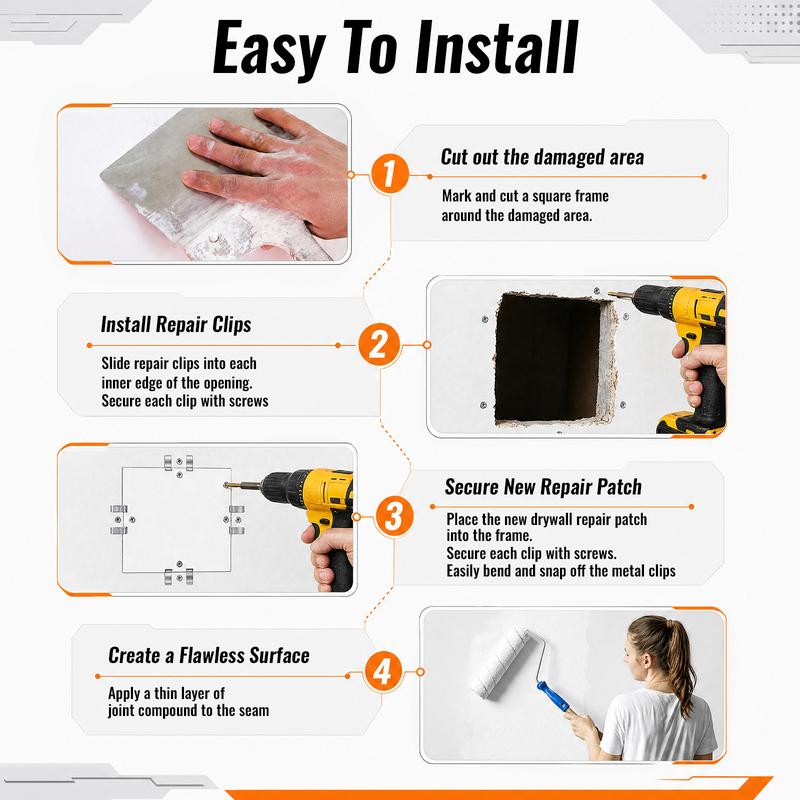
Know the included set
The set contains 10 clips and 20 screws. Keep the hardware together while you plan the wall repair.
Ten clips give you a compact repair set. Keep them together while you plan the placement.
Twenty screws are paired with the clips. Keep them nearby as you prepare the repair.
Match the hardware to the panel and repair location. A clear setup makes the next step easier to see.
Drywall Repair Examples
"I would line up the drywall clips beside the damaged panel before I start. Having the screws close by would help me keep the repair steps in one place and make the small repair easier to organize."
"The metal backed clips would give me a clear piece to position against the drywall. I would keep the screws together and check the panel before fastening so the repair stays easy to follow."
"I would compare the clip size with the drywall panel and mark the repair area first. The screws would stay beside the clips while I work through the setup and inspect the repair."
"A compact set of clips and screws would be easy to stage beside a small wall repair. I would check the panel and place each clip carefully before fastening and inspecting the result."
Frequently asked questions
They are metal-backed clips with screws for 1/2-inch drywall repair.
The set includes 10 clips and 20 screws. Keep the pieces together while planning the repair.
Yes. Confirm that your panel is 1/2-inch drywall before fastening.
The set includes clips and screws. Other tools and repair materials are separate.
Match the clips and screws to the panel and repair area. Keep the setup clear while you work.
Plan The Repair
Position The Clip
Inspect The Result
Hardware You Can See
Plan The Repair
Position The Clip
Inspect The Result
Hardware You Can See
Plan The Repair
Position The Clip
Inspect The Result
Hardware You Can See
Plan The Repair
Position The Clip
Inspect The Result
Hardware You Can See
Plan The Repair
Position The Clip
Inspect The Result
Hardware You Can See
Plan The Repair
Position The Clip
Inspect The Result
Hardware You Can See
Plan The Repair
Position The Clip
Inspect The Result
Hardware You Can See
Plan The Repair
Position The Clip
Inspect The Result
Hardware You Can See
Plan The Repair
Position The Clip
Inspect The Result
Hardware You Can See
Plan The Repair
Position The Clip
Inspect The Result
Hardware You Can See